Office building 3D exterior rendering is the process of generating photorealistic, physically based visualizations of a commercial structure’s facade, massing, site context, and material palette using parametric modeling software and render engines such as 3ds Max with V-Ray, Lumion, or Unreal Engine 5 – before a single column is poured. For commercial real estate developers, these deliverables function as pre-construction decision-support tools: they de-risk design iteration, satisfy municipal planning boards, accelerate investor due diligence, and anchor pre-leasing campaigns with market-grade imagery that converts prospective tenants before occupancy. Applied early in the design development phase, a high-fidelity exterior render resolves facade coordination conflicts, validates material specifications, and communicates massing intent to every stakeholder simultaneously – eliminating the ambiguity that flat CAD elevations routinely introduce.
If you are managing a commercial office development and still presenting 2D elevations to planning committees, capital partners, or anchor tenants, you are creating friction at every stage of the capital stack. The good news: a structured rendering workflow changes that completely.
Partnering with a professional real estate rendering company that specializes in photorealistic commercial visualization gives your development team a competitive edge from design development all the way through lease-up.
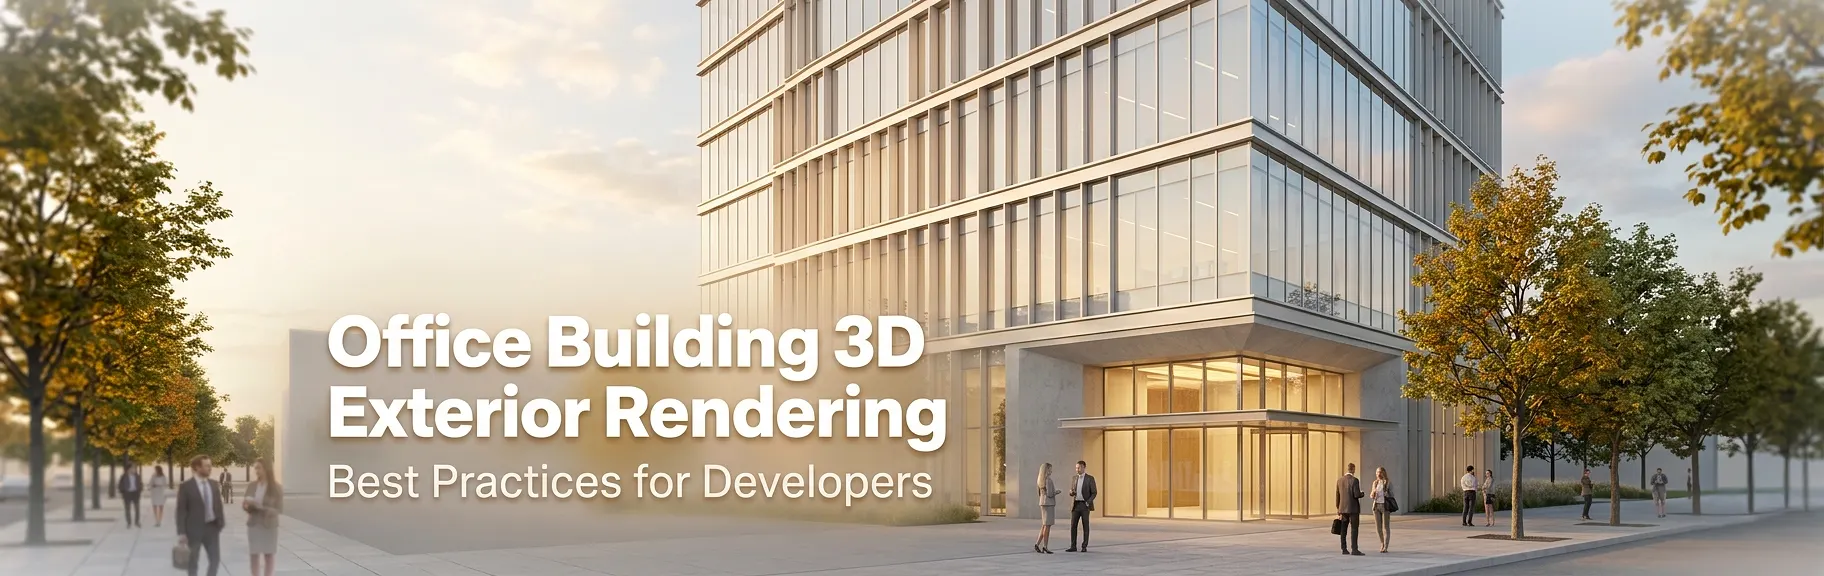
Table of Contents
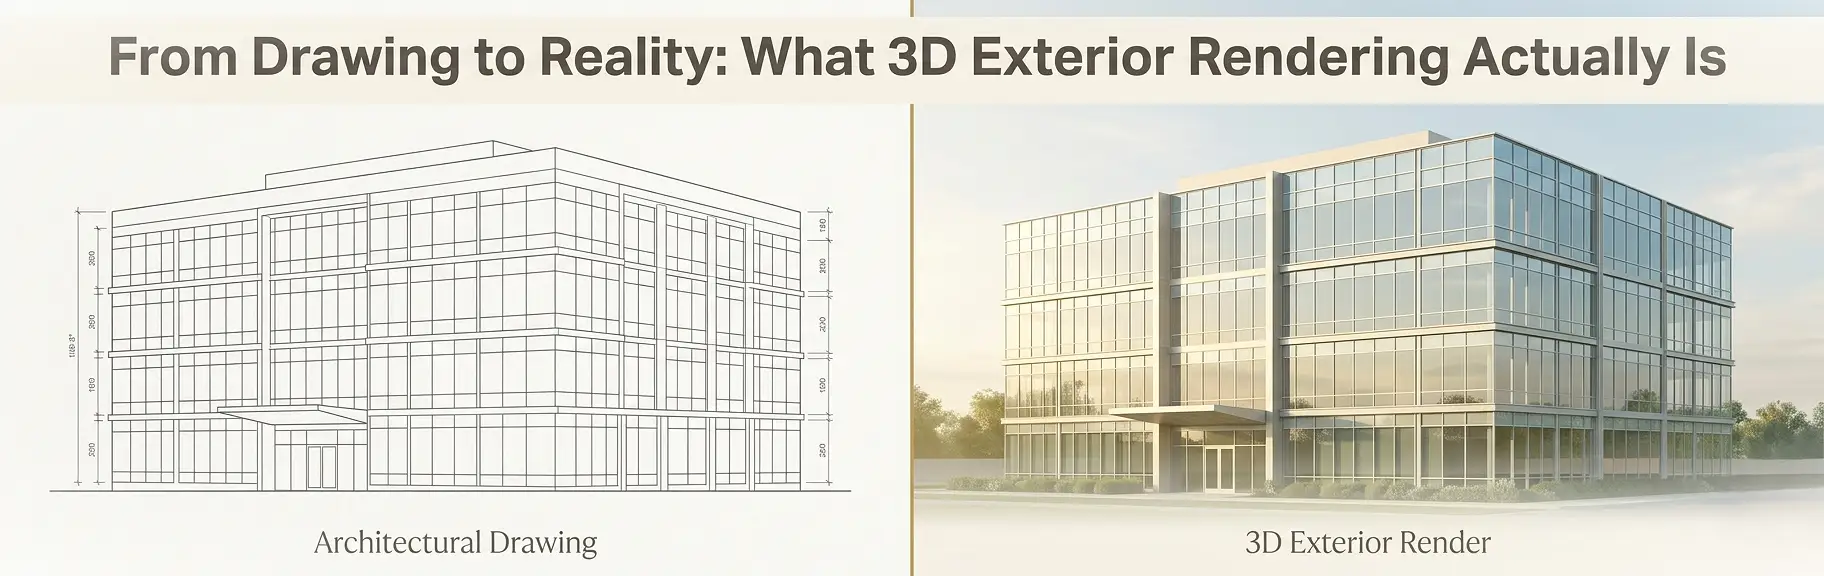
What is Office Building 3D Exterior Rendering?
Office building 3D exterior rendering is a specialized discipline within architectural visualization. It combines:
- Precision geometry modeling sourced directly from Revit, AutoCAD, or SketchUp files
- Physically based rendering (PBR) material assignments that replicate real-world surface behavior – glass reflectivity, concrete porosity, metal sheen, and cladding texture
- HDR lighting environments using sun and sky systems calibrated to the project’s geographic coordinates and target time of day
- Site context integration, including surrounding streetscapes, parking structures, landscaping, and pedestrian-scale human figures
The output is a set of high-resolution image files – typically 4K to 8K – that function as marketing assets, planning submission exhibits, and investor deck visuals.
According to Google’s guidelines on helpful, people-first content, authoritative content must demonstrate genuine expertise and first-hand knowledge. In the rendering industry, that translates directly: the quality of a commercial exterior render reflects the technical depth of the team producing it.
Why Office Exterior Rendering Matters for Developers
Before diving into best practices, it is worth grounding the conversation in business outcomes. Rendering is not an aesthetic luxury – it is a development infrastructure decision.
Accelerating Planning and Zoning Approvals
Municipal planning boards are composed of non-technical stakeholders who struggle to interpret 2D elevations and site plans. A photorealistic exterior render contextualized within the neighborhood fabric communicates scale, massing, and material character instantly. This dramatically reduces the number of revision cycles required before a project receives conditional use approval.
Closing Capital and Debt Financing Faster
Lenders and equity partners evaluate risk before they evaluate returns. A well-executed office building visualization signals developer competence and project viability. It shows that the design is resolved, the materials are specified, and the team is executing – not still figuring it out. Research from Solid Render shows that developers who invest in professional visualization recoup their rendering spend through faster pre-sales and accelerated financing timelines.
Pre-Leasing Office Space Before Construction
Commercial brokers cannot effectively lease space that doesn’t exist yet – unless they have compelling visual assets. High-fidelity exterior renders, combined with interior lobby and amenity visualizations, give leasing teams credible collateral for tenant discussions from day one of the marketing period.
Understanding why real estate developers use rendering services in this context becomes clear: it is about compressing timelines and reducing the capital-at-risk period.
Resolving Design Coordination Issues Early
The rendering process itself is a quality control mechanism. When a team attempts to texture-map a glass curtain wall system onto a parametric massing model, mismatches in mullion spacing, floor-to-floor heights, and corner conditions become immediately visible. Identifying these conflicts at the design development phase costs a fraction of what they cost in the field.
The Office Building 3D Exterior Rendering Workflow: Step by Step
A professional commercial rendering studio follows a structured, iterative workflow. Understanding this process helps developers prepare correctly, set realistic timelines, and get better outputs.
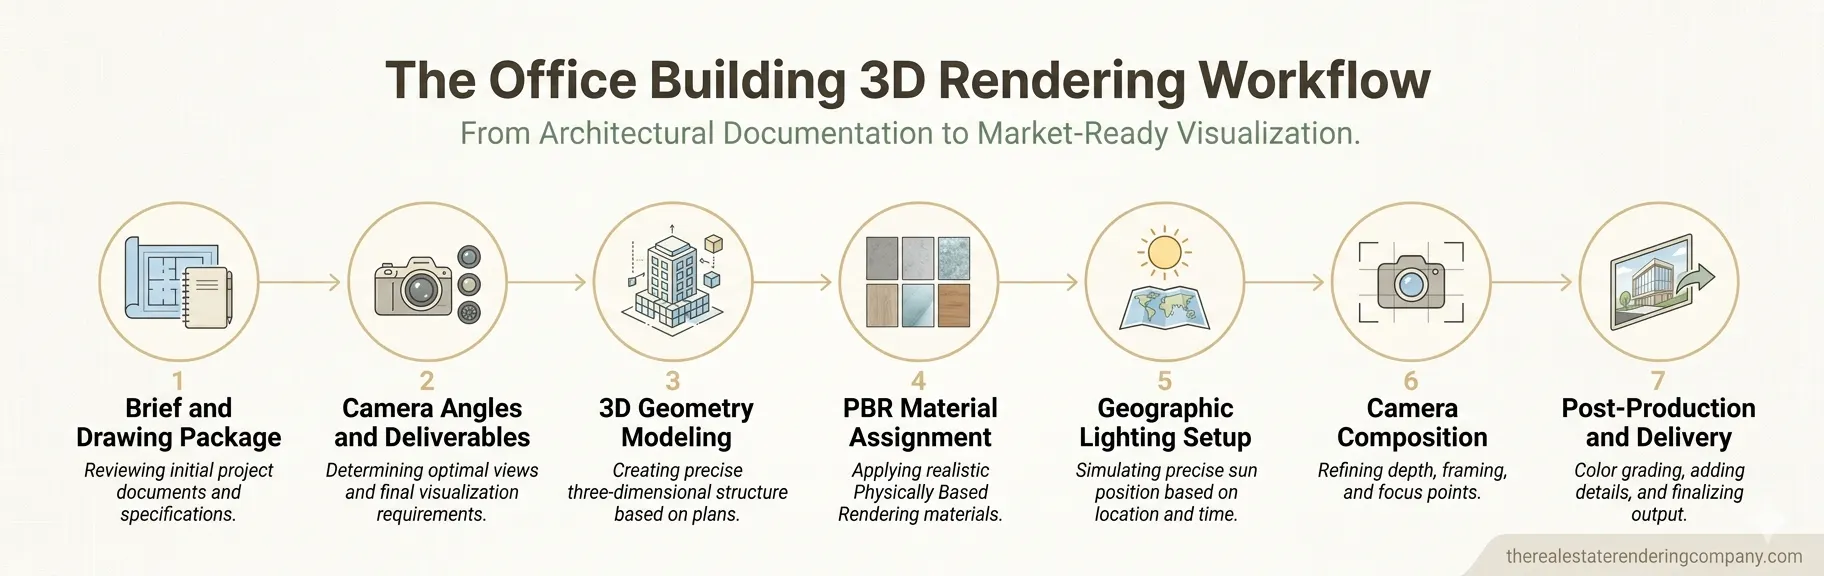
Step 1: Compile a Complete Project Brief and Drawing Package
The quality of the final render is directly proportional to the completeness of the input documentation. Before briefing a rendering team, developers should prepare:
- Architectural floor plans and elevations at 1:100 or 1:50 scale
- Facade system specifications with material manufacturer references (e.g., Kingspan panel code, Guardian glass specification, Hardie panel color)
- Site plan showing property boundaries, adjacent structures, parking, and landscape zones
- Confirmed sun orientation (north arrow) and geographic coordinates
- Reference images illustrating the desired visual mood: daytime photorealistic, golden-hour atmospheric, or overcast neutral
- Brand guidelines if the building identity includes corporate signage or a branded entry canopy
Incomplete briefs generate unnecessary revision cycles and extend delivery timelines. Reviewing how to prepare home plans for 3D exterior rendering provides a transferable checklist that applies equally to commercial projects.
Step 2: Define Camera Angles and Output Deliverables
Not all rendering angles deliver equal commercial value. For a commercial office building, the standard deliverable set typically includes:
| View Type | Primary Use Case | Recommended Resolution |
|---|---|---|
| Street-level pedestrian view | Planning submissions, leasing brochures | 4K (3840 x 2160) |
| Aerial three-quarter perspective | Investor decks, executive presentations | 4K to 6K |
| Entry forecourt close-up | Tenant marketing, lobby approach narrative | 4K |
| Dusk or golden-hour hero shot | Flagship marketing, website hero image | 5K to 8K |
| Streetscape context view | Planning board exhibits, urban design reports | 4K |
Defining this matrix upfront prevents scope creep mid-project and ensures the rendering studio allocates the appropriate poly count and lighting complexity to each scene.
Step 3: 3D Modeling from Architectural Documentation
The modeling phase involves translating the 2D drawing package into accurate 3D geometry. Professional studios work in 3ds Max, Rhino, or directly within the client’s Revit model for BIM-integrated workflows.
Key modeling standards for commercial office buildings include:
- Parametric facade panels: Curtain wall systems require individual mullion, transom, and glass panel modeling rather than flat-mapped texture planes. This is especially important for close-up entry canopy shots.
- Accurate floor-to-floor heights: Verify that the rendering model matches structural slab elevations, not just finished floor heights.
- Site topography: Grade changes, retaining walls, and street crown elevations must be modeled accurately to prevent floating building syndrome – a common error where the structure appears disconnected from the ground plane.
- Surrounding context modeling: A minimum one-block radius of surrounding buildings should be included, even as low-polygon proxy models, to ensure accurate shadow casting and environmental reflections on the subject building’s glazing.
Understanding the difference between 3D rendering and 3D modeling is foundational here: modeling creates the geometry, while rendering converts it into a photorealistic image through lighting and material simulation.
Step 4: Material and Texture Assignment
Material specification is where a commercial exterior render either gains or loses credibility. Common material categories for office buildings include:
- High-performance glazing: Specify the correct glass coating (e.g., Guardian SunGuard SNX 51/23 for a cool silver-blue tint) rather than applying a generic reflective shader
- Metal panel cladding: Anodized aluminum, Cor-Ten steel, and painted composite panels each have distinct reflectivity, specularity, and weathering characteristics
- Masonry and precast concrete: Aggregate size, color variation, and surface finish (bush-hammered vs. smooth-formed) must be captured through high-resolution PBR texture maps
- Landscape materials: Concrete pavers, asphalt, lawn grass, and water features each require specific shader settings to read correctly at street level
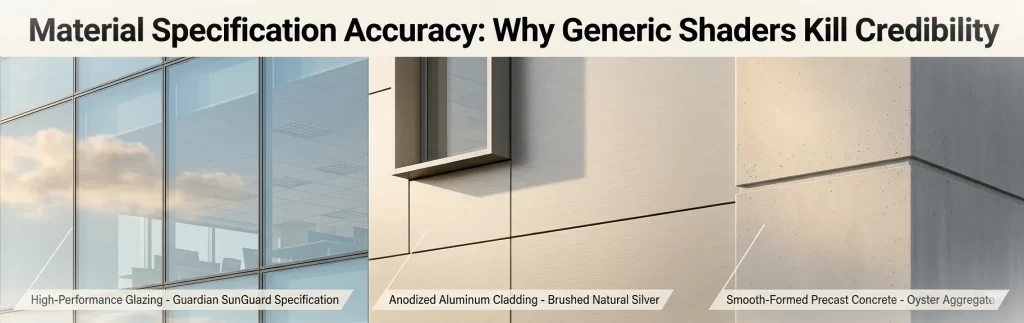
Pro tip: Request physical material samples from the project’s specification consultant before the rendering brief is issued. This eliminates the most common cause of revision cycles – the client approving a render and then realizing the glass color doesn’t match the specified product.
Step 5: Lighting Setup and Environmental Simulation
Lighting is the single most powerful variable in commercial exterior rendering. The difference between a mediocre render and a market-leading one is almost always lighting quality, not modeling detail.
Best practices for office building exterior lighting include:
- Use geographic sun/sky systems: Set the latitude, longitude, and time of day to the actual project location. This ensures shadow angles are accurate for planning submissions and that the building’s solar shading devices render correctly.
- Golden-hour timing for hero shots: The 45-60 minutes after sunrise and before sunset produce warm, directional light that flatters glass and metal facades while generating long shadows that articulate massing.
- Overcast HDRI for technical exhibits: When accuracy matters more than drama (planning board submissions, for example), a neutral overcast sky eliminates shadow distraction and lets the architecture read clearly.
- Artificial lighting integration: If the brief includes a dusk or night-time render, correctly specify luminaire types, Kelvin temperatures, and lux levels for lobby facades, canopy soffits, and pathway lighting.
Step 6: Camera Composition and Depth of Field
Camera placement follows the same compositional principles as architectural photography. For office buildings:
- Eye-level cameras (1.5-1.7m) humanize the scale and are most persuasive for leasing marketing
- Slight upward camera tilt (5-8 degrees) communicates building height and presence without the distortion of extreme perspective
- Foreground framing elements – street trees, pedestrians, vehicle traffic – add life and scale reference
- Selective depth of field can be used subtly to focus attention on the entry sequence or a distinctive facade detail
Avoid over-wide lenses (below 28mm equivalent) for office buildings. They exaggerate perspective distortion and make buildings appear to lean backward, which undermines the professionalism of planning submissions.
Step 7: Post-Production and Final Output Delivery
Raw render output is almost never the final deliverable. Post-production in Adobe Photoshop or Lightroom (and increasingly, AI-assisted tools like Luminar Neo) adds:
- Color grading to establish consistent mood across the deliverable set
- Sky replacement for hero shots where the rendered sky lacks drama
- Entourage population: people, vehicles, market stalls, and street activity
- Atmospheric effects: haze, lens flare, and specular bloom on glazing
- Shadow adjustment and ambient occlusion refinement
The final deliverable package should include layered PSD files alongside the flattened JPEGs, allowing the developer’s marketing team to make minor adjustments without commissioning a full revision.
Choosing the Right Software for Office Building 3D Exterior Rendering
A developer briefing an external rendering studio does not need to operate the software directly. However, understanding the toolchain helps you evaluate studio capability and set informed expectations.
| Software | Primary Role | Best For |
|---|---|---|
| Autodesk 3ds Max + V-Ray | Full rendering pipeline | Large-scale commercial buildings, photorealistic stills |
| Revit + Enscape | BIM-integrated visualization | Design coordination, fast iteration during design development |
| SketchUp + Lumion | Rapid concept visualization | Early-stage massing studies, client-facing design reviews |
| Rhino + Twinmotion | Complex parametric facades | Curved buildings, facade studies, interactive presentations |
| Unreal Engine 5 | Real-time rendering | Investor presentations, interactive walkthroughs |
| Blender + Cycles | Open-source pipeline | Boutique studios, cost-sensitive projects |
For a deeper comparative analysis, the best real estate 3D rendering software guide breaks down tool selection by use case, project type, and budget.
Common Mistakes Developers Make with Office Exterior Renderings
Even experienced development teams make avoidable errors that increase cost, extend timelines, and reduce the quality of the final deliverables.
Mistake 1: Starting the Rendering Brief Too Late
Many developers commission exterior renderings after design development drawings are fully complete, at 90% to 100% construction documentation. At this stage, design changes identified during the rendering process (and they will be identified) are expensive to incorporate into the contract documents.
Best practice: commission concept-level exterior renders at the end of schematic design, when the massing and facade language are established but details remain flexible.
Mistake 2: Under-Specifying Materials
Providing a rendering studio with a note that reads “glass and metal cladding” is not a material specification – it is an invitation for the studio to guess. Generic guesses look generic. Specific material references produce credible, specification-accurate renders.
Mistake 3: Requesting Too Many Camera Angles
More angles do not necessarily mean more value. A focused set of four to six high-quality renders – each serving a specific use case – outperforms a set of twelve mediocre ones produced under time and budget pressure.
Mistake 4: Skipping the Surrounding Context
Office buildings do not exist in isolation. A render that shows only the subject building against a white background reads as unfinished. Context – streets, adjacent buildings, landscape – makes the design feel real and placed.
Mistake 5: Ignoring Revision Round Structure
Every professional rendering engagement includes a defined number of revision rounds. Developers who bank revisions and then request multiple simultaneous changes during a single round create confusion and slow the workflow. Provide consolidated, prioritized feedback after each review.
Expert Tips for Getting Maximum ROI from Your Rendering Investment
These are the practices that separate developers who treat rendering as a production cost from those who use it as a strategic asset.
1. Sequence renders to match the capital stack timeline. Commission a hero exterior render and one aerial perspective before your equity raise closes. These become the visual centerpiece of your investor deck. Save the detailed entry canopy and streetscape renders for the pre-leasing phase.
2. Negotiate unlimited-use licensing upfront. Rendering deliverables should be usable across all channels: printed brochures, digital advertising, social media, the project website, and planning submissions. Confirm that the studio’s contract grants full commercial usage rights before signing.
3. Request editable sky and time-of-day variants. A single daytime render and a dusk variant of the same camera angle double your marketing versatility at marginal additional cost – typically 20-30% of the original render fee.
4. Integrate the rendering brief with the architect’s BIM model. Studios that can import your project’s Revit model directly save significant modeling time and eliminate the risk of geometry discrepancies between the rendering and the actual design intent.
5. Use renders to stress-test the design before committing to specifications. A photorealistic visualization of the facade system will reveal problems that CAD elevations hide. Use the rendering process as a paid design review, not just a marketing exercise.
Reviewing how 3D renderings help sell properties faster provides additional evidence-backed arguments you can use to justify the rendering budget to your development partners.
Understanding Pricing for Office Building 3D Exterior Rendering
Rendering fees for commercial office buildings vary based on scope, complexity, output resolution, and turnaround time. Here is a general benchmark framework:
| Deliverable | Complexity Level | Typical Price Range (USD) |
|---|---|---|
| Single exterior still, basic context | Low (simple massing, standard materials) | $300 – $700 |
| Single exterior still, full context | Medium (detailed facade, landscaping, entourage) | $700 – $1,500 |
| Hero dusk/golden-hour exterior | High (full atmospheric lighting, full post-production) | $1,500 – $3,500 |
| Aerial perspective, full site context | High (site modeling, aerial entourage) | $1,500 – $3,000 |
| Full deliverable set (4-6 angles) | Complex commercial building | $4,000 – $12,000+ |
| Animated walkthrough (30-60 seconds) | High (full scene animation) | $5,000 – $20,000+ |
For a detailed, current pricing breakdown aligned with specific project types, the real estate rendering price list provides transparent market-rate guidance.
Note: Price should never be the primary selection criterion for a commercial project. A render used in a $50 million equity raise or a 20,000 sq ft pre-leasing campaign has an asymmetric ROI. Prioritize studio experience with commercial typologies, quality of portfolio samples, and revision policy clarity over per-render price.
Office Building 3D Exterior Rendering vs. Traditional Presentation Methods
| Presentation Method | Stakeholder Comprehension | Design Iteration Speed | Marketing Usability | Planning Submission Strength |
|---|---|---|---|---|
| 2D CAD elevations | Low | Fast | None | Moderate |
| Physical scale model | High | Slow and expensive | Low | High |
| Basic SketchUp massing model | Moderate | Fast | Low | Low |
| Photorealistic 3D exterior render | Very High | Moderate | Very High | Very High |
| Animated 3D walkthrough | Very High | Slow | Excellent | High |
| Real-time interactive model (UE5) | Very High | Moderate | Excellent | Moderate |
The table makes a clear case: photorealistic office building 3D exterior rendering delivers the best balance of stakeholder comprehension, marketing usability, and planning submission strength relative to its production cost.
According to research covered by NoTriangle Studio’s 2026 developer guide, 3D renderings, architectural animations, and VR have become decision-making tools that reduce uncertainty, prevent approval delays, and help projects secure funding faster – outcomes that directly impact a developer’s project IRR.
How to Brief a Rendering Studio for a Commercial Office Project
A well-structured brief saves time, reduces revisions, and ensures the studio understands your business context – not just the architectural program.
A professional rendering brief for an office building should include:
- Project overview: Building type, gross floor area, number of floors, target occupancy (single tenant, multi-tenant, mixed-use ground floor)
- Design stage: Schematic, design development, or construction documents
- Key stakeholders and primary use case: Equity raise, planning submission, pre-leasing, public relations launch
- Deliverable list: Number of stills, animations, resolution requirements
- Timeline: Deadline for first draft, revision rounds, final delivery
- Drawing package: CAD/BIM files, material specifications, site plan
- Reference images: Visual mood board illustrating desired lighting, material palette, and human activity level
- Budget range: Transparency here helps the studio optimize the scope within your constraints
- Brand guidelines: If signage, typography, or corporate color appears on the facade or entry
For frequently asked questions about the commercial rendering process, the 3D exterior rendering for commercial real estate FAQs page covers the most common developer questions about timelines, revisions, and file formats.
The Role of 3D Exterior Rendering Across the Development Lifecycle
One of the most common misunderstandings in development teams is treating rendering as a single, one-time deliverable. In practice, a well-integrated visualization strategy produces different assets at different development stages.
| Development Phase | Rendering Type | Primary Purpose |
|---|---|---|
| Feasibility and land acquisition | Concept massing render | Internal team alignment, initial stakeholder discussions |
| Schematic design | Design option comparison renders | Architect/developer design review, pre-application planning meetings |
| Design development | Full photorealistic hero renders | Equity raise, planning submission, early leasing collateral |
| Construction documentation | Final marketing render set | Pre-leasing campaign launch, project website, print marketing |
| Pre-opening | Construction progress overlays | Investor updates, tenant communication |
This phased approach maximizes the return on each rendering investment by aligning the deliverable to the decision it needs to support.
Frequently Asked Questions: Office Building 3D Exterior Rendering
What is office building 3D exterior rendering?
Office building 3D exterior rendering is the digital production of photorealistic images depicting a commercial building’s exterior – including its facade system, site context, landscaping, and surrounding streetscape – before construction begins. It uses physically based rendering (PBR) software to simulate real-world lighting, materials, and environmental conditions at publication quality.
How long does an office building 3D exterior rendering take to produce?
Turnaround times vary by project complexity. A single exterior still for a moderately complex office building typically takes 5-10 business days from brief confirmation to first draft delivery. A full deliverable set of 4-6 angles can take 2-4 weeks. Rush delivery options are available from most professional studios at a premium.
What files does a rendering studio need to start an office exterior render?
At minimum, studios require architectural floor plans, building elevations, a site plan, and material specifications. BIM files (Revit or ArchiCAD) are preferable. Visual mood references and confirmed north orientation significantly improve brief quality and reduce revision cycles.
How much does office building 3D exterior rendering cost?
Pricing ranges from approximately $700 to $3,500 per hero exterior still for a commercial office building, depending on building complexity, level of site context, resolution requirements, and post-production depth. Full deliverable sets for major developments can range from $4,000 to $12,000 or more.
Can office building 3D exterior renderings be used for planning submissions?
Yes. Photorealistic exterior renderings are widely accepted – and increasingly required – by municipal planning departments for design review submissions, conditional use applications, and design excellence programs. Renders must accurately represent the proposed materials, massing, and site context to meet submission standards.
What is the difference between a 3D render and a 3D model for an office building project?
The 3D model is the digital geometry – the spatial representation of the building’s structure, facade, and site. The 3D exterior render is the final image produced when lighting, materials, and camera settings are applied to that model through a rendering engine. The model is the foundation; the render is the finished deliverable.
How do I choose the right rendering studio for my commercial office project?
Evaluate studios on three criteria: their portfolio of commercial office typologies (not just residential), their revision policy and timeline commitments, and their brief intake process. A studio that asks detailed questions about your deliverable use case, target audience, and drawing package quality is investing in a better result – not just starting faster.
What camera angles deliver the most value for office building exterior renderings?
For commercial office buildings, the highest-value angles are: a street-level pedestrian view that humanizes the entry sequence, a three-quarter aerial perspective that communicates massing and site context for investor presentations, and a golden-hour hero shot for flagship marketing. A close-up of the entry canopy or lobby approach is also highly effective for pre-leasing collateral.
Elevate Your Office Development with Professional 3D Exterior Rendering
Office building 3D exterior rendering has moved well beyond a nice-to-have visualization exercise. For today’s commercial real estate developers – operating in a capital environment where lenders, planning authorities, and institutional tenants all expect market-grade visual communication – a professional rendering program is a core development infrastructure investment.
The best practices outlined in this guide – from structured briefing and specification-accurate material assignment to lighting calibration and phased deliverable planning – are not abstract principles. They are the operational standards that separate development teams who close deals faster from those who lose time and capital to preventable friction at every gate.
The cost of a high-quality exterior render is typically a rounding error relative to the development budget. The cost of a failed equity raise, a stalled planning approval, or a pre-leasing campaign that generates no leads is not.
Ready to move your commercial office development from drawings to market-grade visuals? Explore professional real estate rendering services that deliver specification-accurate, investment-grade exterior renderings built for developers who need results – not revisions.