Living room 3D interior rendering is the process of generating a photorealistic digital image of a residential living space by applying ray-traced global illumination, Physically Based Rendering (PBR) material shaders, and IES-profiled artificial light sources to a fully modeled 3D scene. Professional studios use rendering engines such as V-Ray and Corona Renderer alongside HDRI environment maps to simulate real-world light behavior across every surface, producing buyer-ready imagery that is visually indistinguishable from an architectural photograph. The output is a high-value pre-construction deliverable that eliminates design ambiguity, accelerates purchase decisions, and serves as a direct revenue driver across residential real estate marketing pipelines.
Every developer, interior designer, and real estate agent working in today’s competitive property market faces the same challenge: buyers need to feel a space before they commit. A floor plan communicates dimensions; a 3D render communicates lifestyle. When that render depicts the living room – the most emotionally charged room in any home – it carries extraordinary persuasive weight.
If your project demands professional real estate rendering services and photorealistic architectural visualization, understanding the technical and creative decisions behind a great living room render is the first step toward briefing a studio that will consistently deliver results worth paying for.
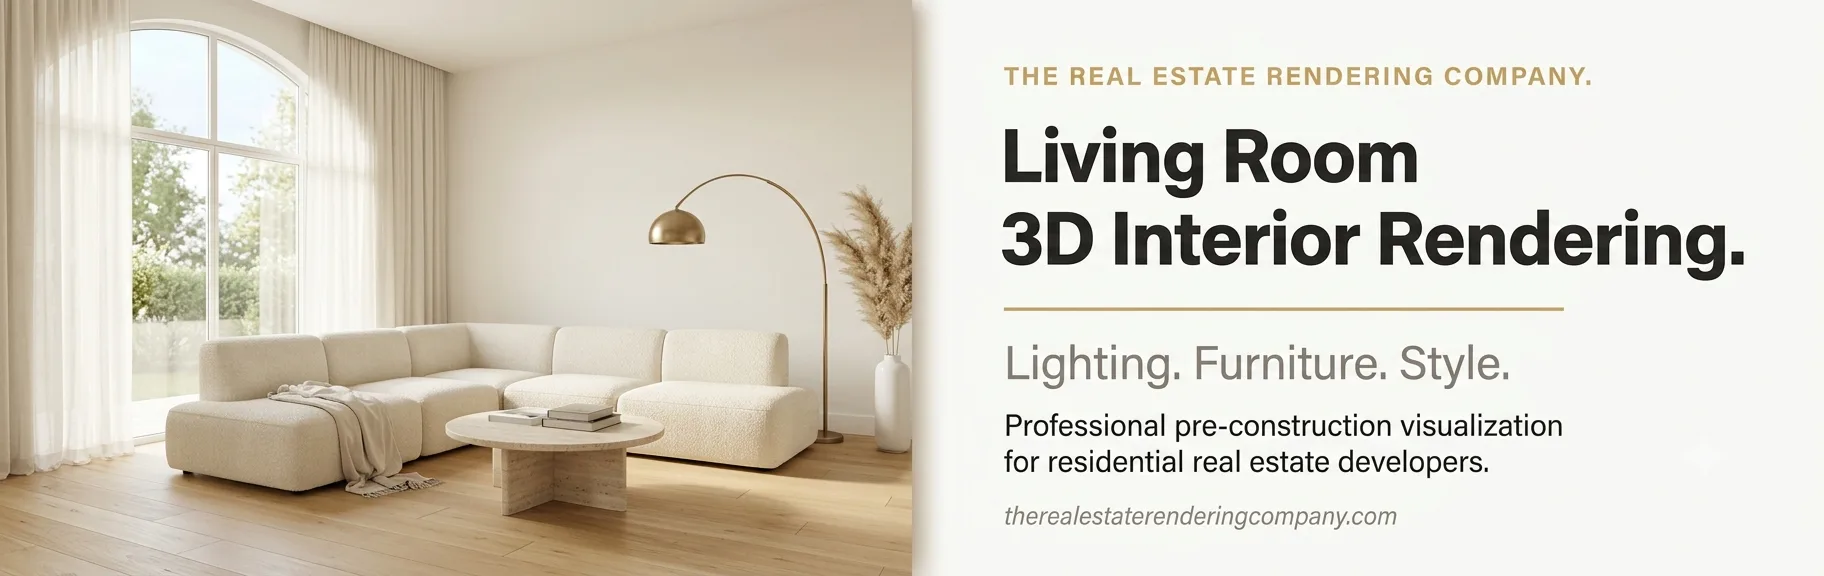
Table of Contents
What is Living Room 3D Interior Rendering?
Living room 3D interior rendering is the discipline of converting architectural drawings, design specifications, and material selections into a fully realized, photorealistic image of a residential living space – before a single wall is built or a single piece of furniture is purchased.
At its technical core, the process involves four distinct phases:
- 3D Scene Construction: A rendering artist builds accurate geometry for walls, ceilings, floors, architectural detailing, furniture, and fixtures from the supplied floor plans and elevations.
- Material and Texture Assignment: Every surface receives a PBR shader that defines its roughness, reflectivity, metalness, and subsurface behavior – matching the exact finishes specified by the designer.
- Lighting Configuration: Primary natural light sources (windows, skylights, glass doors) are set up using HDRI environment maps and portal lights. Artificial sources (recessed fixtures, floor lamps, pendants) are assigned IES photometric profiles that replicate real-world luminaire output.
- Rendering and Post-Production: A ray-tracing or path-tracing engine calculates global illumination across the scene. The resulting raw output is then refined in post-production with exposure correction, color grading, and selective depth of field.
The end result is an image that communicates not only how the room looks, but how it feels to be inside it.
Why the Living Room Matters Most in Residential Visualization
The living room is the anchor of any residential property. Buyers picture themselves relaxing there, entertaining guests, and spending time with family. For this reason, the living room render carries more persuasive weight per square foot than virtually any other space in a home.
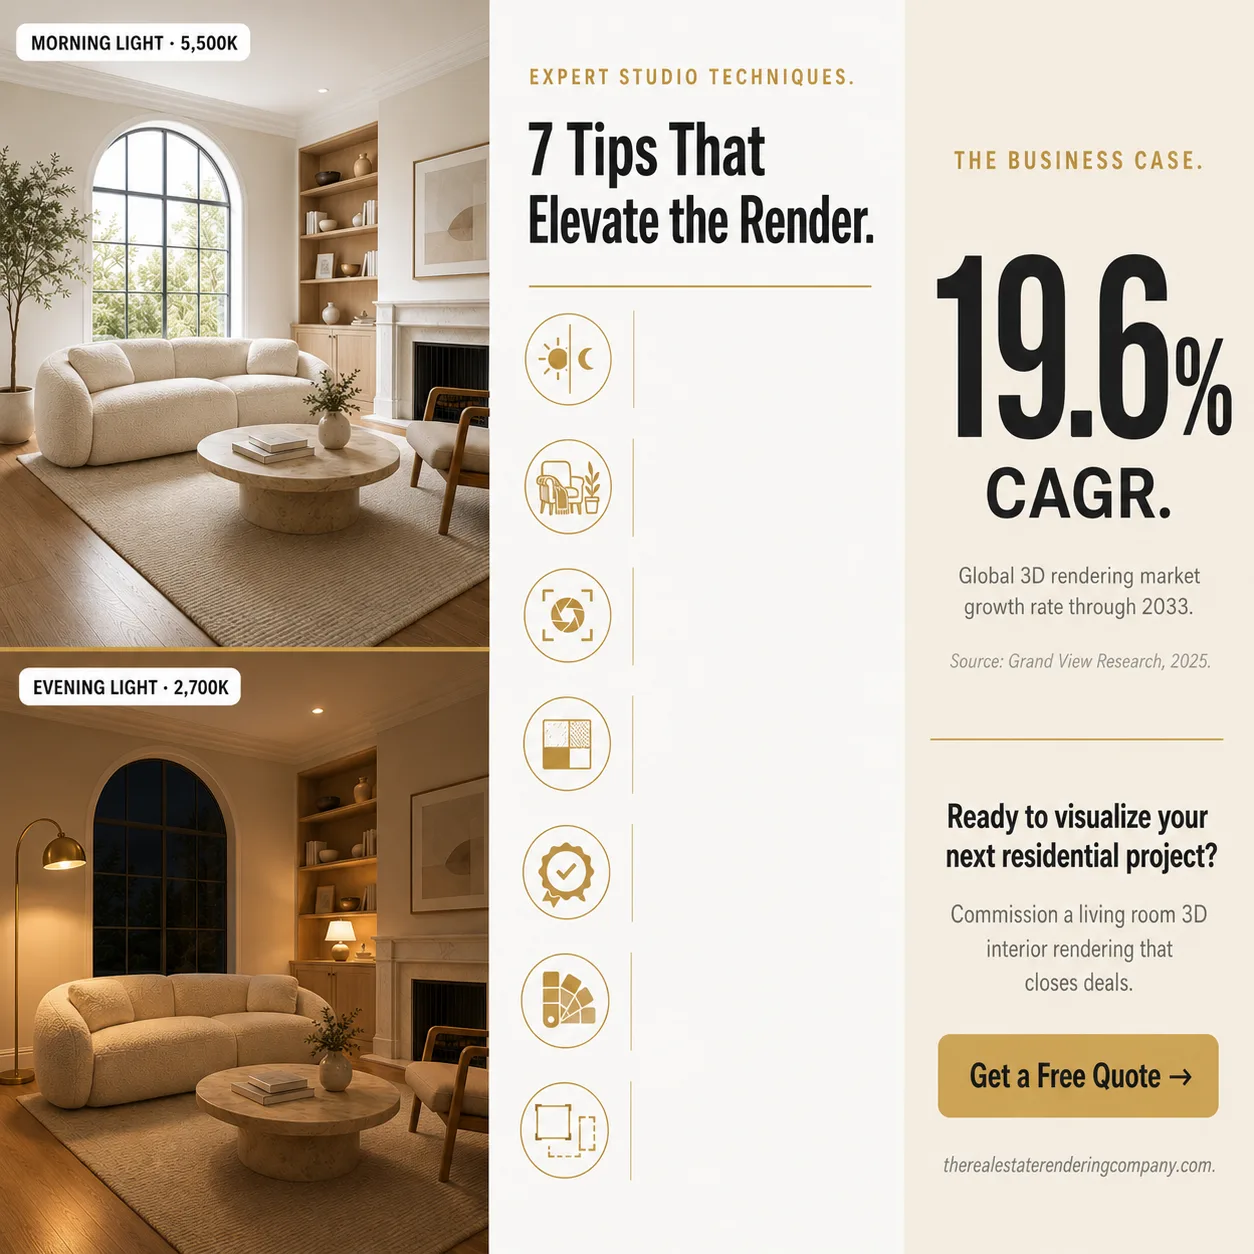
According to Grand View Research, the global 3D rendering market was valued at USD 4.5 billion in 2025 and is projected to reach USD 19.8 billion by 2033, growing at a CAGR of 19.6%. This growth is driven in large part by the real estate sector’s adoption of photorealistic visualization as a standard marketing tool – not a luxury.
For a broader view of how this fits into the development pipeline, our guide on why real estate developers use rendering services covers the full strategic and commercial rationale.
The Three Pillars of a Photorealistic Living Room 3D Interior Rendering
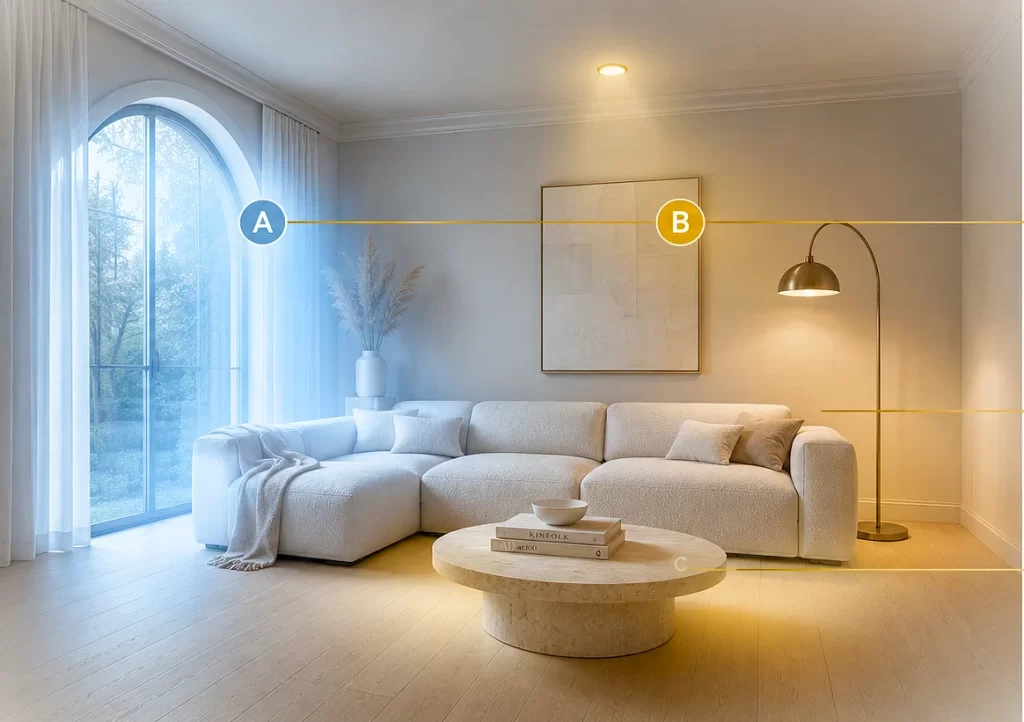
Every outstanding living room render is built on three foundational pillars. Miss any one of them and the image will feel artificial, no matter how much detail surrounds it. These three pillars are: lighting architecture, furniture scale and composition, and material fidelity.
Pillar 1: Lighting Architecture
Lighting is the single most powerful variable in any interior rendering. It determines whether a space reads as warm and inviting, clinically cold, dramatic, or intimate. Professional studios approach it as a deliberate three-layer system:
Layer 1 – Ambient and Environmental Light
This is the primary light source: natural daylight entering through windows, glass doors, and skylights. Studios simulate it using HDRI environment maps combined with physically accurate sun-sky models.
The color temperature of this layer shifts depending on the time of day chosen for the render:
- Midday sun: 5,500-6,500K – bright, neutral, energetic
- Late afternoon: 2,700-3,500K – warm, golden, intimate
- Overcast sky: 6,000-7,000K – soft, diffused, even
Portal lights placed at window openings guide the light engine to sample efficiently from these openings, which dramatically reduces noise and render time in interior scenes.
Layer 2 – Artificial Task and Accent Lighting
Every interior fixture, from recessed LED downlights to sculptural pendants and floor lamps, contributes its own photometric distribution. Studios assign IES profiles to each source to replicate the precise spread, intensity falloff, and color temperature of the actual specified luminaire. Warm residential tones (2,700-3,000K) dominate this layer in living room renders, creating the cozy ambience buyers respond to emotionally.
Layer 3 – Global Illumination and Bounce Light
In the real world, light bounces off floors, walls, ceilings, and furniture to fill shadows with soft secondary illumination. Rendering engines such as V-Ray and Corona Renderer simulate this through global illumination (GI) algorithms. Without accurate GI, shadows in an interior appear unnaturally dark and flat, which immediately signals to viewers that the image is computer-generated rather than photographed.
Quick Answer: What makes a living room render look photorealistic? The three most impactful factors are: (1) layered, physically accurate lighting using HDRI maps and IES profiles; (2) furniture and objects modeled to exact real-world dimensions; and (3) PBR materials with correct roughness, reflectivity, and texture scale values.
Living Room Lighting Color Temperature Reference Table
| Light Source | Color Temperature | Mood It Creates |
|---|---|---|
| Midday south-facing window | 5,500-6,000K | Bright, clean, energetic |
| Late afternoon window | 2,700-3,200K | Warm, golden, intimate |
| Overcast / north-facing window | 6,000-7,000K | Soft, consistent, cool |
| Recessed LED downlights | 2,700-3,000K | Cozy, residential warmth |
| Pendant / statement fixture | 2,700-3,200K | Focused, decorative depth |
| Cove / indirect LED strip | 2,700-3,000K | Layered, architectural glow |
| Candlelight-temperature lamp | 2,200-2,400K | Intimate, hygge ambience |
Pillar 2: Furniture Scale, Placement, and Composition
Incorrect furniture scale is the single fastest way to destroy the credibility of a living room render. When a sofa reads even slightly oversized, the room feels cramped. When a coffee table sits too low relative to the seating, the entire spatial logic collapses. Buyers notice these issues immediately, even if they cannot articulate exactly what feels wrong.
Scale accuracy principles used by professional studios:
- Source all furniture models from manufacturer-verified dimensions. A standard three-seat sofa typically measures 84-96 inches wide; a coffee table height sits between 16-18 inches.
- Include human-scale reference objects: a table lamp, a stack of hardcover books, or a casually draped throw blanket. These anchor the viewer's sense of proportion.
- Position the virtual camera at human eye level - approximately 48-60 inches from the floor - with a field of view between 35 and 55 degrees. This produces the natural perspective buyers recognize from real interior photography.
Furniture placement principles:
- Keep all primary seating within an 8-9 foot conversational radius. This communicates that the room functions comfortably.
- Maintain at least 36-48 inches of clear circulation between furniture groupings.
- Anchor the seating arrangement with an area rug large enough that the front legs of all sofas and chairs rest on it.
- Avoid overcrowding. Well-edited staging reads as luxury; cluttered staging reads as small.
Composition techniques:
- Apply the rule of thirds. Position the primary sofa or focal piece off-center for a dynamic, editorial feel.
- Build depth deliberately: a foreground element (side table, plant), a mid-ground seating group, and a background anchor (fireplace, feature wall, window view).
- Allow intentional negative space. Empty floor area around the seating group makes a room feel larger and more aspirational.
Pillar 3: Material Fidelity and Surface Detail
Materials communicate what a space feels like before anyone walks through it. The visual weight of a travertine floor, the soft warmth of bouclé upholstery, the precision of brushed brass hardware - all of these trigger an emotional response in buyers at a subconscious level. PBR workflows make this possible through a set of physically calibrated shader channels:
- Albedo / Diffuse Map: Defines the base color and surface pattern - wood grain, stone veining, fabric weave.
- Roughness Map: Controls how sharp or blurred surface reflections appear. Polished marble shows crisp mirror reflections; matte linen scatters light softly.
- Normal / Bump Map: Adds micro-surface detail - fabric texture, brushed metal grain, tile grout joints - without increasing scene geometry.
- Metalness Map: Distinguishes conductors (metals) from dielectrics (wood, fabric, stone), governing how each surface interacts with light.
- Displacement Map: Physically offsets geometry at render time for high-detail surfaces like rough plaster, stone cladding, or high-pile carpet.
Two professional principles that consistently separate amateur renders from portfolio-quality work:
- Scale textures to real-world dimensions. A hardwood plank texture mapped at 10x its actual size produces enormous, obviously fake grain. Always match the UV scale to the physical dimensions of the material.
- Introduce controlled imperfections. Real surfaces have slight color variation, minor wear, and micro-surface irregularities. Perfectly pristine renders look sterile. A subtle fingerprint smudge on a glass coffee table or gentle compression in an upholstered cushion makes a scene instantly more believable.
Living Room Interior Design Styles and How to Render Each One
The design style chosen for a living room shapes every rendering decision downstream: the lighting temperature, the furniture silhouette, the material palette, and the compositional approach. Below is a practitioner's breakdown of the five most commercially relevant residential living room styles in 2025-2026 and the specific rendering techniques each one demands.
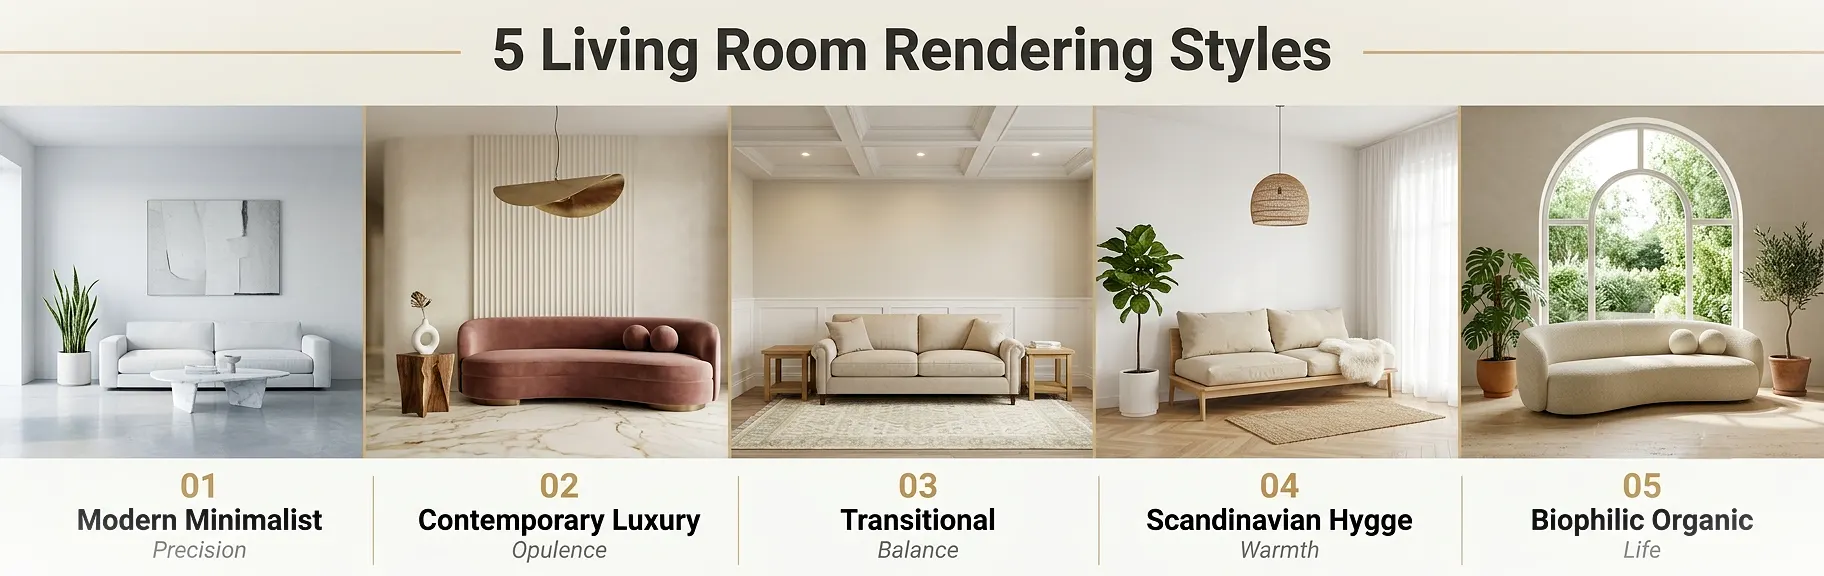
1. Modern Minimalist
Design language: Clean geometry, restrained neutral palettes (warm whites, soft grays, light oak), open negative space, zero decorative clutter.
Rendering approach:
- Use cool-to-neutral ambient light (4,500-5,500K) to emphasize architectural precision and clean lines.
- Keep materials high in roughness with subtle variation; avoid busy surface patterns.
- Limit decorative objects to three hero pieces maximum: one architectural plant, one large-format artwork, one sculptural object.
- Compose the camera wide and symmetrical, reinforcing the openness of the layout.
Key trap to avoid: Minimalist does not mean empty. Renders with too little furniture look like unoccupied units rather than curated living spaces.
2. Contemporary Luxury
Design language: Layered textures, statement lighting, rich material contrasts (velvet against marble, brass against linen), bold personalization within a sophisticated palette.
Rendering approach:
- Layer warm artificial lighting (2,700-3,000K pendants, sconces, floor lamps) over cooler ambient daylight to create depth and visual drama.
- Apply high-specular materials selectively: polished marble flooring, lacquered cabinetry, brushed brass hardware.
- Use live-edge timber, sculptural furniture forms, or bespoke decorative objects as visual anchors.
- Apply shallow depth of field in post-production to replicate a high-end editorial photography aesthetic.
3. Transitional
Design language: The most commercially popular residential style. It bridges traditional architectural detailing (crown molding, coffered ceilings, wainscoting) with contemporary furniture silhouettes and layered neutral palettes.
Rendering approach:
- Use warm-neutral ambient light (3,000-3,500K) that flatters both warm timber tones and crisp white trim.
- Balance architectural period details with clean-lined upholstered seating in linen, wool, or performance fabric.
- Layer textiles for depth: a patterned area rug, solid throw cushions, a textured blanket. Textile variety signals quality without visual noise.
4. Scandinavian / Hygge
Design language: Warm natural timber, white walls, layered soft textiles, abundant diffused natural light, and biophilic elements including plants, natural stone, and raw linen.
Rendering approach:
- Prioritize soft, fully diffused daylight filtered through semi-sheer linen curtains. Avoid hard shadows entirely in this style.
- Supplement with candlelight-temperature (2,200-2,400K) floor and table lamps for evening compositions.
- Material palette centers on natural oak, whitewashed surfaces, sheepskin, and woven jute.
- Include at least one living plant element (fiddle-leaf fig, trailing pothos, clustered succulents) to add organic imperfection to the scene.
5. Biophilic and Organic Modern
Design language: The fastest-growing residential category heading into 2026. Curved organic furniture forms, natural materials throughout (travertine, terracotta, raw linen), earthy palettes, and abundant plant life.
Rendering approach:
- Maximize natural light. Large arched windows and skylights bathing the scene in filtered outdoor light are central to the style.
- Favor curved and organic furniture geometry over rectilinear forms.
- Use an earth-tone material palette: warm sand, terracotta, mossy sage, raw linen, honed travertine.
- Place living plant assets so they overlap and soften furniture edges - creating layered, organic depth rather than a staged, catalog-style arrangement.
Living Room Rendering Style Comparison Table
| Style | Lighting Temp | Key Materials | Furniture Form | Signature Detail |
|---|---|---|---|---|
| Modern Minimalist | 4,500-5,500K | Polished concrete, matte plaster, light oak | Rectilinear, low-profile | Restrained palette; max 3 hero objects |
| Contemporary Luxury | 2,700-3,000K artificial + cooler daylight | Marble, velvet, brushed brass, lacquer | Sculptural, statement silhouettes | Shallow DoF; editorial framing |
| Transitional | 3,000-3,500K | Linen, wool, warm timber, white trim | Clean-lined upholstered | Layered textiles; period detailing |
| Scandinavian / Hygge | 2,200-3,000K | Natural oak, sheepskin, linen, jute | Low, curved, organic | Soft diffused light; living plants |
| Biophilic / Organic | Natural daylight dominant | Travertine, terracotta, raw linen, clay | Curved, soft organic forms | Abundant greenery; earthy palette |
The Professional Living Room 3D Rendering Workflow: Step by Step
Understanding the production workflow helps developers and designers write better briefs, set realistic timelines, and reduce revision cycles. Here is exactly how professional studios approach a living room rendering project from start to delivery.
Step 1: Design Brief and Asset Collection
Before any software is launched, a professional studio collects:
- Dimensioned floor plans and reflected ceiling plans (in .dwg, .pdf, or .rvt format)
- Interior finishes schedule: flooring, wall color codes (RAL, NCS, or brand references), ceiling treatment
- Furniture specification list with manufacturer names, model references, and finish selections
- Lighting fixture schedule with manufacturer references and lamp specifications
- Visual mood board: 6-10 reference images representing target style, lighting quality, and material palette
- Camera angle preferences or reference images from similar projects
The quality of the brief package directly determines the quality of the first draft and the number of revision rounds required. For practical guidance on preparing project documentation, our walkthrough on how to prepare home plans for 3D exterior rendering covers transferable principles that apply equally to interior briefs.
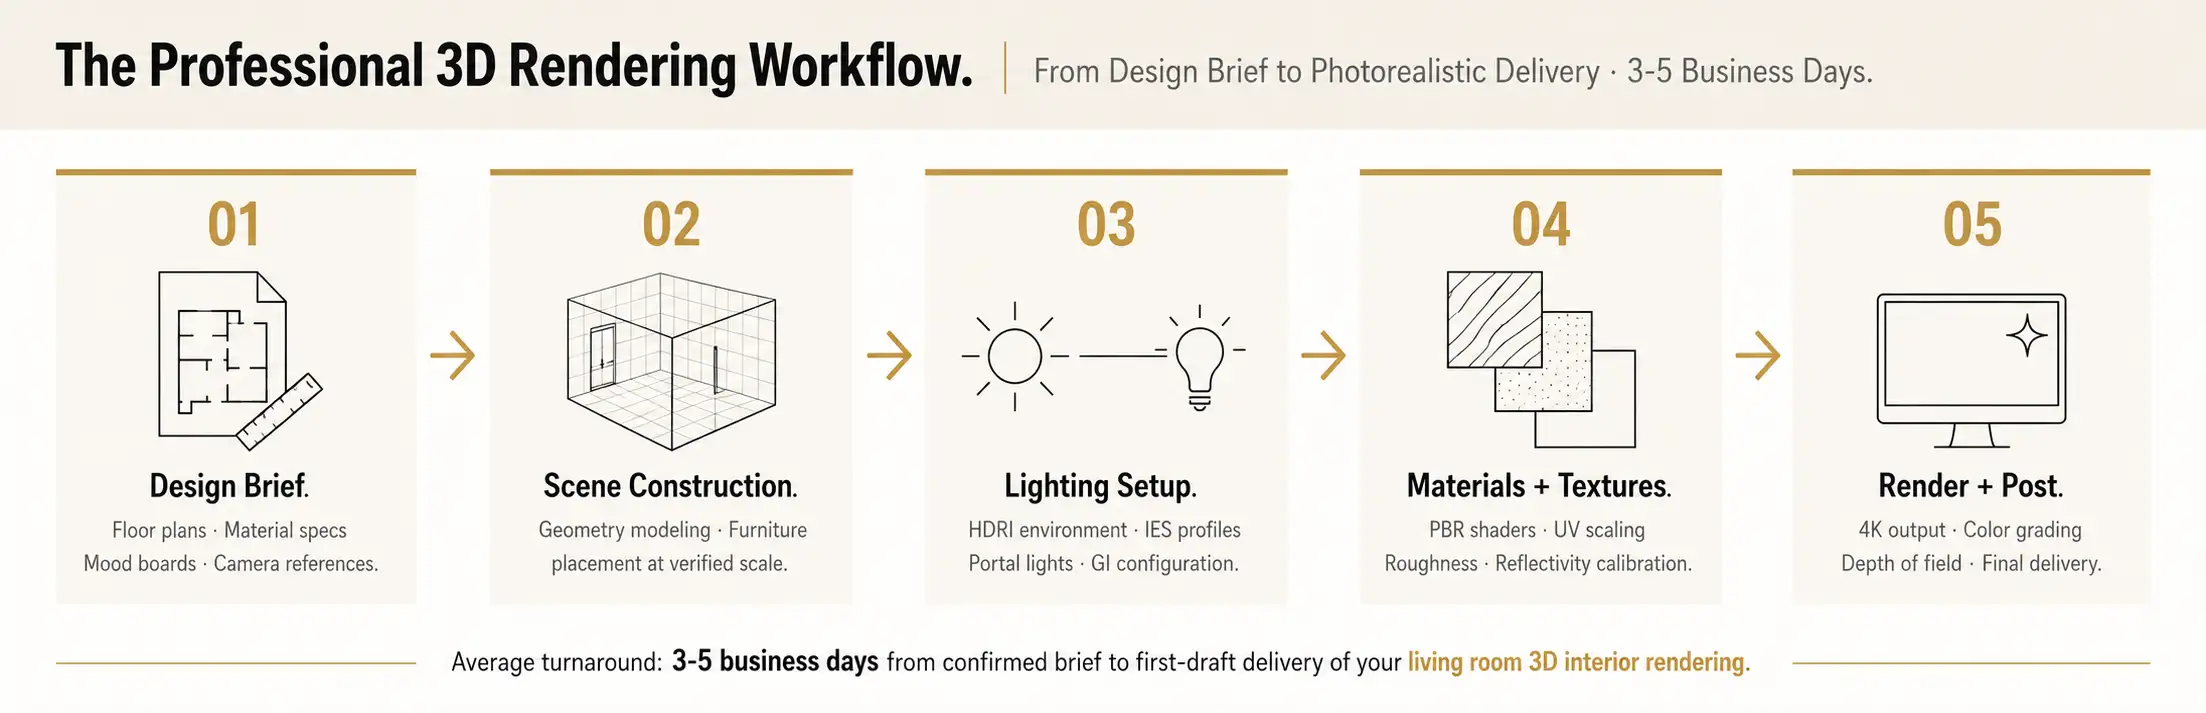
Step 2: 3D Scene Construction
The artist builds room geometry from the architectural drawings:
- Walls, floors, ceilings, and architectural details modeled to exact dimensions
- Furniture placed and scaled to specification
- Windows and openings positioned accurately to establish correct light-entry geometry
- Placeholder materials assigned to verify spatial relationships before fine material work begins
Step 3: Lighting Setup and Environment Configuration
This is the highest-skill phase of the entire workflow. The artist:
- Selects the time of day and sun angle that best serves the design narrative
- Loads and rotates an HDRI map to match the site's real-world orientation and context
- Places portal lights at every window and door opening to direct the GI sampler efficiently
- Configures each artificial fixture with its IES profile, color temperature, and intensity
- Runs low-resolution test renders to validate the lighting setup before committing to final output
Step 4: Material and Texture Application
Every surface in the scene receives its final PBR shader assignment:
- Hardwood floors: grain-direction roughness variation, subtle lacquer sheen, correct plank-width UV scale
- Upholstered furniture: layered fabric normal maps for micro-surface texture, slight compression variation
- Metal hardware: precise metalness and roughness values matching the specified finish (brushed vs. polished)
- Glass: correct IOR (Index of Refraction) and transmission settings for windows, table surfaces, and decorative objects
Step 5: Final Render and Post-Production
The scene is submitted to the rendering engine at final resolution (typically 4K or above). Post-production in compositing software then addresses:
- Exposure and white balance correction
- Color grading tuned to the design's intended emotional tone
- Selective depth of field, subtle lens bloom on light sources, and minor lens distortion
- Selective sharpening on hero material surfaces (upholstery weave, stone grain)
- Final export in the specified formats and dimensions
A standard single living room render delivered by a professional studio typically takes 3-5 business days from confirmed brief to first-draft delivery. Revision rounds are usually returned within 24-48 hours per cycle.
Software Used in Professional Living Room 3D Interior Rendering
Choosing the right rendering engine significantly affects both the realism ceiling of the final image and the speed of production. Here is how the leading tools compare in residential interior visualization contexts:
| Software | Engine Type | Primary Strength | Typical Use Case | Learning Curve |
|---|---|---|---|---|
| V-Ray (Chaos) | Unbiased ray tracing | Maximum material accuracy, broad DCC support | High-end luxury interiors, mixed pipelines | High |
| Corona Renderer | Unbiased path tracing | Warm, natural interior lighting; simpler workflow | Residential interiors, archviz studios | Medium |
| Lumion | Biased real-time | Speed, live walkthroughs, easy scene setup | Developer presentations, fast turnarounds | Low |
| Enscape | Real-time GPU | Live design review, Revit/SketchUp integration | Design iteration, client walkthroughs | Low |
| D5 Render | Real-time ray tracing | Fast photorealistic output, good asset library | Mid-range residential, quick stills | Low-Medium |
| Blender (Cycles) | Unbiased path tracing | Cost efficiency, high-quality stills | Budget-conscious studios | High |
According to production data from professional render farms, Corona Renderer jobs skew heavily toward interior and residential archviz workflows, while V-Ray spans a broader mix including VFX, product visualization, and GPU-accelerated animation pipelines. For a deeper analysis of how software choice affects project outcomes and costs, our comprehensive guide to the best real estate 3D rendering software covers each platform in detail.
As Chaos Group notes in their technical resources on 3D furniture rendering, the quality of the 3D asset library, the lighting methodology, and the artist's compositional judgment collectively have far more impact on the final image than the choice of rendering engine alone.
7 Common Mistakes That Ruin Living Room 3D Interior Renders
Even experienced studios fall into these traps. Identifying them early saves significant revision time and budget.
Mistake 1: Flat, Single-Source Lighting
Problem: Using only a single ambient sky light or one overhead source flattens the scene entirely. Without layered illumination, shadows disappear, depth collapses, and the image looks like a video game screenshot.
Fix: Always build the three-layer lighting stack: environmental ambient, artificial task and accent, and global illumination bounce. Every professional interior render depends on all three working together.
Mistake 2: Incorrect Furniture Scale
Problem: Even minor scale deviations - a sofa 8 inches too tall, a coffee table 4 inches too wide - make the entire room feel dimensionally wrong. Buyers and designers register this immediately.
Fix: Source all furniture models from verified manufacturer dimensions. Cross-check every key piece against standard size references before closing the scene.
Mistake 3: Texture Scale Errors
Problem: A wood plank texture mapped at 10x its real-world size produces enormous, obviously unreal grain. A tile pattern at 0.1x creates a dense, pixelated mosaic. Both read as render artifacts instantly.
Fix: Always apply real-world UV scaling. A standard oak plank should visually read at 3-5 inches wide in the rendered scene. Tile grout lines should match the specified joint width.
Mistake 4: Perfectly Pristine Surfaces
Problem: Real spaces have micro-imperfections: slight variation in upholstery color, minor surface wear on leather, a faint fingerprint smudge on glass. Renders with 100% perfect surfaces look sterile and unconvincing.
Fix: Layer subtle dirt, wear, and variation overlays onto surface shaders. The goal is believability, not flawlessness.
Mistake 5: Poor Camera Positioning
Problem: Cameras placed too high cut off furniture bases and create an uncomfortable bird's-eye view. Cameras placed too low distort proportions and produce an unnatural crawling perspective.
Fix: Keep the camera at 48-60 inches (human eye level) with a 35-55 degree field of view. This is how the room will actually be experienced by buyers walking through it.
Mistake 6: Overloaded Accessories and Decorative Objects
Problem: Filling the scene with too many books, candles, plants, sculptures, and props creates visual clutter that overwhelms the design and slows render times.
Fix: Apply the hero objects principle. Select three to five carefully chosen accent pieces that serve the design narrative. Every additional object beyond that should be justified specifically.
Mistake 7: Empty or Blown-Out Window Views
Problem: Window areas showing nothing but white overexposure or flat gray sky break spatial immersion immediately. Buyers notice instantly when the world outside a living room window does not exist.
Fix: Always add an exterior context image or environment: a garden, a streetscape, a tree canopy, or a soft clouded sky. This grounds the render in physical reality and adds aspirational lifestyle value to the composition.
Expert Tips for Next-Level Living Room Renders
These are the techniques that separate technically correct renders from portfolio-quality imagery that actually sells property.
1. Commission two lighting scenarios from one scene. Build the scene once, then render it as a bright morning daylight version and a warm evening lamp-lit version. This doubles your marketing content output at minimal additional cost and demonstrates the space's versatility to buyers across different emotional contexts.
2. Use implied human presence rather than staged perfection. An open book on a side table, a coffee cup on the coffee table, a casually thrown blanket over a sofa arm - these micro-staging details suggest authentic habitation and warmth. They make a render feel lived-in rather than showroom-pristine.
3. Apply selective depth of field in post-production. A shallow focus effect mimicking a 35-50mm camera lens draws the viewer's attention directly to the primary furniture grouping. It creates the visual language of professional interior photography and makes the render feel more like an editorial image than a technical visualization.
4. Coordinate material temperature across surfaces. Warm timber tones against a cool stone floor create pleasant contrast. Warm timber against terracotta walls creates a rich, enveloping atmosphere. Choose a dominant temperature for the space and use the opposing temperature as a deliberate accent. Accidental temperature mixing reads as unresolved design.
5. Use verified manufacturer furniture models wherever possible. Premium furniture brands including Restoration Hardware, B&B Italia, Cassina, and Flexform supply high-fidelity 3D models to studios. These assets carry a level of geometric and material accuracy that generic library furniture cannot match.
6. Render multiple finish options from a single scene asset. Once the 3D scene is built, swapping materials to show two or three finish alternatives - light oak versus dark walnut flooring, white Carrara marble versus warm Calacatta Gold - is one of the most cost-effective uses of a completed visualization asset.
7. Plan camera compositions for multiple output formats from the start. A 16:9 landscape crop serves website hero banners. A 1:1 square crop is optimized for Instagram grid posts. A 4:5 portrait crop performs best in paid advertising. Brief the studio on all required output formats before renders begin so compositions accommodate each crop correctly.
The Business Case: ROI of Living Room 3D Interior Rendering
The investment in professional living room renders is not a marketing expense - it is a sales infrastructure cost with measurable returns. Research from Enterprise League confirms that properties marketed with professional 3D visualizations receive more inquiries, attract more qualified buyers, and move to contract faster than comparable properties presented through traditional methods alone.
Developers using comprehensive rendering packages report compressing pre-sales timelines significantly while also achieving stronger unit pricing, because buyers are purchasing from a position of visual confidence rather than imagination.
For current market-rate pricing on residential rendering packages, our detailed real estate rendering price list provides a transparent breakdown by deliverable type and complexity level.
Our in-depth piece on how to sell properties faster with 3D renderings explores the conversion mechanics in detail, including specific case data on how render-supported listings perform against non-rendered comparables.
How to Brief a Studio for a Living Room Render: A Practical Checklist
A well-prepared brief is the single most effective way to reduce revision rounds and ensure the final render reflects your design intent accurately. Use the following checklist before submitting your project.
Architectural documentation:
- Dimensioned floor plan to scale (.dwg, .pdf, or .rvt)
- Reflected ceiling plan showing fixture locations and ceiling heights
- Window and door schedule with opening dimensions
- Any structural elements: columns, beams, niches, built-in joinery
Interior finishes specification:
- Flooring material, pattern, finish, and plank/tile dimensions
- Wall finish with exact paint code (RAL, NCS, or brand reference)
- Ceiling treatment details and any cornice or molding profiles
- All furniture items with manufacturer name, model reference, and finish selection
- Lighting fixture schedule with manufacturer and lamp specification
- Window treatment type and fabric: sheer, block-out, drape style
Visual direction:
- Mood board with 6-10 reference images covering target style, lighting quality, and material palette
- Preferred time of day for the hero render
- Camera angle preferences or comparable interior photography references
- Any branding standards or project color guidelines
Delivery requirements:
- Minimum output resolution (recommend 4K: 3840 x 2160 px minimum)
- Required aspect ratios and crop formats for each end use
- Agreed number of revision rounds within scope
- Final file formats required (.jpg, .png, .tiff)
Also note: understanding the core distinction between the modeling phase and the rendering phase will help you communicate more precisely with your studio. Our explainer on the difference between 3D rendering and 3D modeling clarifies exactly where each phase begins and ends in the production pipeline.
Frequently Asked Questions: Living Room 3D Interior Rendering
What is living room 3D interior rendering? Living room 3D interior rendering is the computer-generated visualization of a residential living space at photorealistic quality. Using modeling software and ray-tracing engines, a studio builds a digital replica of the room, applies physically accurate lighting and PBR material shaders, and produces a final image or animation showing exactly how the space will look before it is built or staged.
How long does a professional living room render take? A standard single living room render typically takes 3-5 business days from confirmed brief to first-draft delivery. Complex scenes involving custom furniture modeling, multiple finish options, or animation components can take 7-14 business days. Rush delivery is available at most studios for an additional fee.
What files do I need to provide? At minimum: a dimensioned floor plan, a material and finishes schedule, and furniture references or a mood board. The more complete your brief, the more accurately the first draft reflects your intent and the fewer revision rounds you need.
Which rendering software is best for living room interior renders? V-Ray and Corona Renderer are the industry benchmarks for photorealistic residential visualization. For faster turnarounds and live presentations, Lumion and Enscape offer compelling real-time results. The best choice depends on the project's quality requirements, timeline, and pipeline.
How much does a professional living room 3D interior render cost? Renders range from a few hundred dollars for a standard single image to over a thousand for a premium photorealistic still. Multi-room packages offer better value per image. See our real estate rendering price list for a current breakdown.
Elevate Your Residential Project with Photorealistic Living Room Visualization
Living room 3D interior rendering is no longer optional for serious residential developers, designers, and agents. It is the standard by which buyers now evaluate properties before visiting them - and the visual benchmark against which every competing listing is measured.
The difference between a render that closes deals and one that goes unused comes down to three decisions made at the start of every project: a disciplined, physically accurate lighting strategy; furniture and material specifications grounded in real-world dimensions and PBR accuracy; and a compositional approach that guides the viewer's eye through a story of how the space actually feels to live in.
Developers who treat living room renders as strategic sales infrastructure - rather than an avoidable line item - consistently achieve faster pre-sales, stronger pricing, and less dependency on costly physical staging.
If you are ready to bring that standard of visual quality to your next residential development, renovation, or marketing campaign, our team is ready to deliver. Partner with The Real Estate Rendering Company and convert your living room designs into photorealistic assets that sell.